A couple of weeks ago I took a little rest from my Horse Chestnut painting and decided to try and paint some colourful Cockerel/Rooster feathers. I had never painted a feather before and I admire the work of Elizabeth Romanini (https://www.facebook.com/elizabeth.romanini?fref=ts) and thought I would like to try it one day.
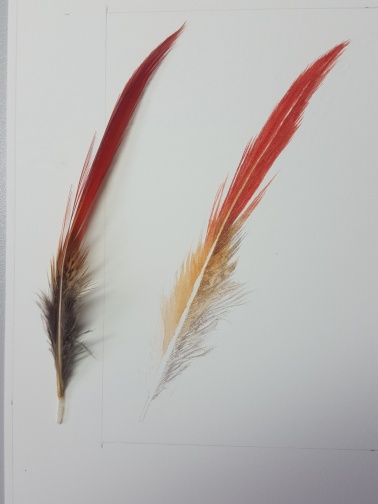
I chose three Cockerel/Rooster feathers from my collection, which are very colourful. I thought they would be easier to paint than my Owl feathers to start off with as they are not so pale in colour.
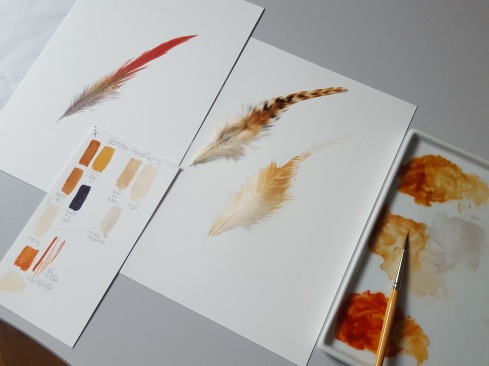
To begin with, I drew up the red feather on my watercolour paper. Making sure I drew it on very lightly so that it would be easy to erase on the paler areas. The colours of this feather really appealed to me. I decided to slant my drawing to the right rather than have it positioned straight up as this seemed a more interesting composition.
Next, I made my swatches mixing up my colours and painting them onto a piece of watercolour paper to keep as a reference should I need to mix more of the same colour. I also note down the colours I used to mix each shade. For the brightest red, I used Sennelier Rose Madder Lake, Winsor Red and a little Quinacridone Gold. This makes a really bright red and the S.Rose Madder Lake just knocks it back a little without losing the vibrance. I then mixed up a selection of warm orange/tan tones for the middle section and a darker red for the shadow areas by adding Perylene Maroon to my original bright red mix. I then mixed some beigey browns and greys for the bottom section of the feather. Now I was ready to start painting!
See my swatch sheet below for my colour mixes.
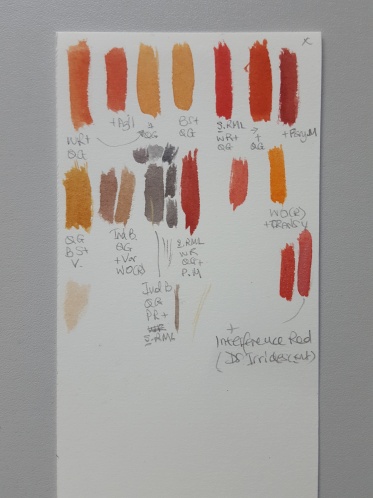
For colours listed on all my swatches – the codes are as follows: QG – Quin Gold, WR – Winsor Red, Azil – Alizarin Red, BS – Burnt Sienna, S.RML – Sennelier Rose Madder Lake, Pery M or PM – Perylene Maroon, WO (R) – Winsor Orange (Red Shade), PR – Permanent Rose, Trans Y – Transparent Yellow, WL – Winsor Lemon (not Lemon yellow, V – Winsor Violet, Vi – Viridian, Ind B – Indanthrene Blue, H20 – added water,
One other colour I used was Daniel Smith Interference Red (an iridescent colour) and I used this on the red part of the feather at the end to make it glisten a little.
Painting stage
I began to lay down my first wash. I use a Billy Showell no. 2 brush and a Sable Rigger size 0 for the fine detail. Red can be a tricky colour to build up in layers and if you’re not careful it will go muddy and thick, laying on top of the paper rather than seeping in. For the first wash, I used the wet-in-wet method, this was to allow for more layers to be added safely allowing the colour to increase in density without becoming thick, you must make sure each layer is thoroughly dry before adding the next! Whilst adding the red I also added a little of the orangy/tan colour under the red area and a little pale grey to the bottom, being careful to keep the edges at the bottom very, very pale. Once this was dry I added another wet-in-wet layer of the colours to strengthen it all up. I was careful not to go over the rachis (stalk/vane through the centre) as I would paint this in last. There was, however, a small area of orange tone on the top half of the rachis which needed to blur into the red area.
I don’t add the fine detail and ‘after feather’ (wispy bits towards the bottom of the feather), until the end.
Now my feather was starting to look nice and bright, I started to add in the pattern detail on the right-hand side orange/tan area with a watered-down grey and then a few of the ‘after feather’ parts – very pale to start with! There is a very pale hint of the orange/tan in the ‘after feather’ area too, so I used a little of that colour with the grey to build up this area.
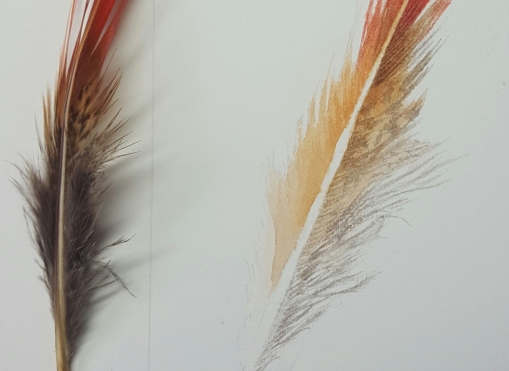
Some of the after feathers were a little thicker and you could see the pinnate appearance like the veins on a pinnate leaf. If you look closely you will see this. Use a magnifying glass if necessary. You can add some of this with a very fine brush and light pale strokes. Don’t worry about doing all of them, an indication on a few will suffice. This again needs to be done in layering as you’ll need to have different strengths of ‘after feathers’ to give it depth. The bottom of the feather is quite a dark grey so you will need a few layers to achieve this. Try not to go over all of the ‘after feathers’ and you’ll get a nice variation of shades.


Now for the detail stage. On the red part, I needed to add some very fine darker red lines and some shadowing to the right side. This looked difficult to paint as the lines go straight up from the bottom to the top. If painting a fine line seems almost impossible you need to get the flow of pigment to water just right to achieve this. Use a number 2 pointed full-bodied sable brush, I use a Billy Showell brush for this as it is very versatile and holds water well. Unfortunately, you cannot buy them anymore but she does have a synthetic range. In fact, I use her no. 2 brush for almost everything! Wet your paint and brush. Another method is to make rough lines by spreading the tip of the brush into lots of points. To do this take a little paint into the brush and push it against the palette surface to make a fan shape. Remove excess from the base of the brush near the ferrule on a cloth or kitchen roll. Test it first! Angle the brush as flat as possible then run it across a scrap piece of paper. Hold the brush more upright for thinner lines. You should get multiple rough lines appearing. Here are two little videos to explain. You need to hold the brush almost upright to achieve fine lines!
Once this was done I started to build up the grey area at the bottom and add the finer details. Having finished the detailing I then painted the main rachis (stalk/vein through the centre) and was careful to retain the light on either side of it. Lastly, I ran a thin darker grey line along the right side of the rachis to give it depth.

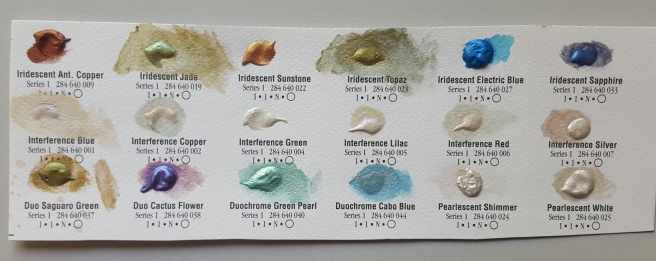
For the next feather, I chose a lovely fluffy one with a chevron design in beautiful tan colours. I applied the same principle as above to this feather but at the end I noticed the light catching the after feathers and they were glistening. To achieve this effect I mixed a little white gouache and used a little Daniel Smith Pearlescent White (iridescent paint) to highlight the shiny parts. It’s even good to add shiny areas to the feather strands. You don’t need to buy a whole tube of iridescent paint, you can buy a ‘Dot Card’ online which is enough. You need such a small amount so don’t waste your money on tubes unless you start using them all the time of course!
See below the iridescent treatment on the after feathers. This is the finished feather with a close up of the iridescent part.


Lastly, I chose a beautiful iridescent emerald green and tan feather. A very flamboyant one with a super curved shape to it. I used the same process to paint the feather and because of its beautiful iridescence, I used Daniel Smith Iridescent Jade and Topaz at the final stage. To achieve a strong emerald green colour I used Winsor Blue (Green Shade), a fabulously rich electric blue, mixed with a little Indanthene Blue, Winsor Lemon (not Lemon yellow) and a touch of Quinacridone Gold. I mixed a dark greyish green for the areas that were darker in shadow, taking great care not to lose my highlights. I build the green up in thin layers to avoid the thickening of the paint on the surface.
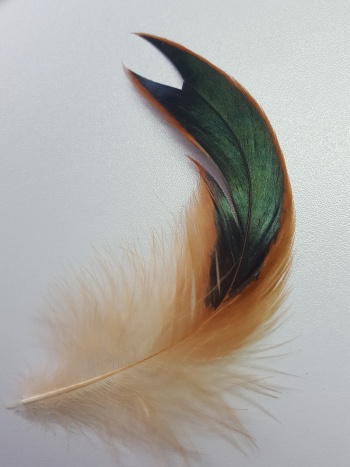


Here is the finished feather and iridescent detail.


Well, that’s the end of my feathery pursuits for now. I’ll be painting some more owl and flamingo feathers next year, so look out for that blog too!
*All photos, content, text and videos are subject to copyright – Jackie Isard Botanicals 2017

Brilliant, Jackie. Thank you for sharing your process! 🙂
LikeLike
Thank you so much Linda! 😊
LikeLike
Your photos and videos are so very helpful! Just seeing the technique gives me a bit more confidence to try those challenging feathers….
LikeLike
Thanks so much Gail! So pleased it helped you 😊😊
LikeLike
Jackie, this is a fabulous post and the videos are wonderful! Would you consider offering an online course for the feathers? I would sign up and pay without a moments hesitation. Also, is there a reason why you don’t use masking fluid to prot ct the centre vein? Thanks kindly for your generous sharing and please think about an online course. Thank you. Sandy Allen, Alberta, Canada
LikeLike
Hi Sandy!thanks so much for your compliments. I would love to do an online course on feathers. Let me do some research, get a plan together and I’ll get back to you. I didn’t use making fluid as I’m very practiced in doing it without but I would suggest using it to a student. I would also use it myself if the area was thinner! I’ll be back to you soon! Jackie😊😊
LikeLike