Next in my sketch book are two more beautiful wild flowers, Devil’s-bit scabious (Succisa pratensis) and Greater Knapweed (Centaurea scabiosa). Devil’s-bit scabious is a cute little plant with leggy stems ending in a pretty little button shaped lilac/blue flowers. Greater Knapweed is a grander and more flamboyant version of Common Knapweed (Centaurea nigra). The flower head forms in a thistle-like fashion opening into a beautiful cluster of purple petals with flowing delicate petals beneath which float outwards like exaggerated ladies’ fingers. (See header picture, taken at Box Farm Meadow)
I chose Devil’s-bit scabious as it is the food plant of the declining Marsh Fritillary butterfly and Greater Knapweed as it is particularly appealing to insect wildlife. Insects including bees and butterflies are very fond of this plant, notably the Marbled White butterfly.
In the spring I planted some of the plants I am studying in my garden with the intention of using them for botanical reference and colour studies. The slugs seemed to love it much to my displeasure! But they grew and I was able to study and dissect them as needed. Later in the Spring I also scattered some wildflower seeds which included Greater Knapweed and to my surprise one healthy plant grew tall and strong. This year I have sown seeds for all 8 plants I want to study for my RHS entry, so let’s hope they all grow for next years additions to my sketch book!
Devil’s-bit scabious Succisa pratensis
The flower head of the Devil’s-bit scabious if a perfect bundle of small flowers packed into a ball shape. The pattern formed by these florets is a fibonacci series, spiralled.

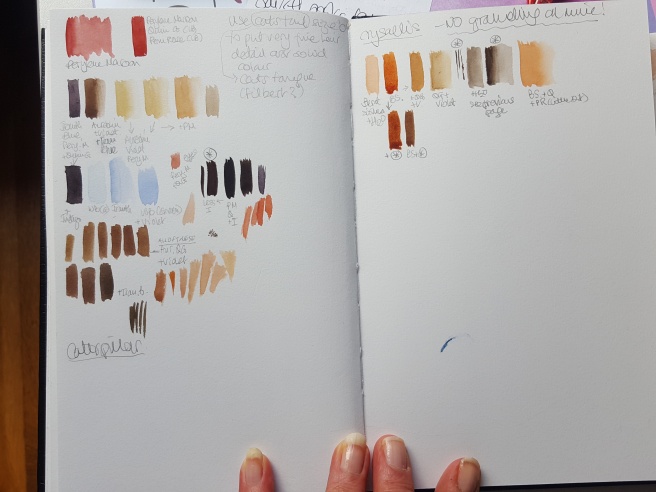
As the flowers open into their beautiful lilac blossoms the pollen bearing anthers protrude further than the flower forming a little halo of darker pink around the flower head with puffs of yellow/white pollen at their tips. When the plant was young and partly opened it reminded me of a baby in a pretty lace bonnet! As the flowers fade the petals fall and we are left with a green ball of empty sepals which will then develop and produce the seeds. At this stage I took colour references from my plant and painted them into my sketchbook for future reference.


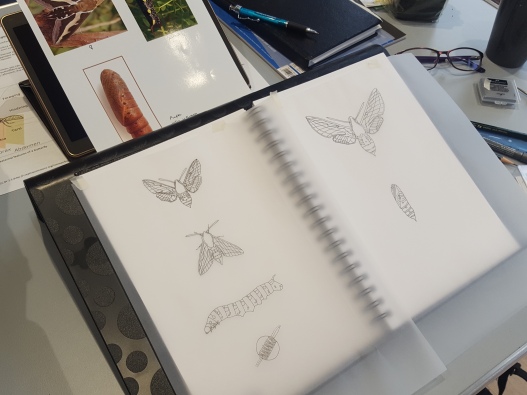
In my studies I dissected the very small flowers and illustrated the parts of the plant. The seed head has not yet matured so I will need to add this at a later date. I wanted to show the plants structure by breaking it into sections as a memory aid. I selected sections of the plant to show how it changes up the stem as the plant is quite tall.


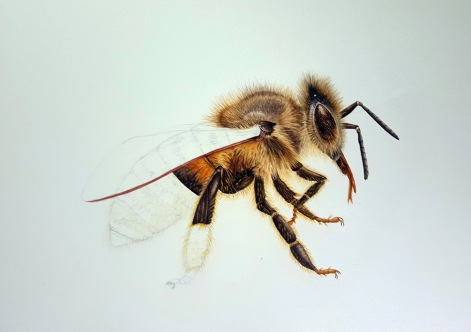
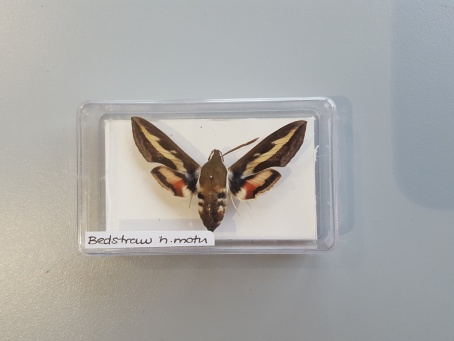
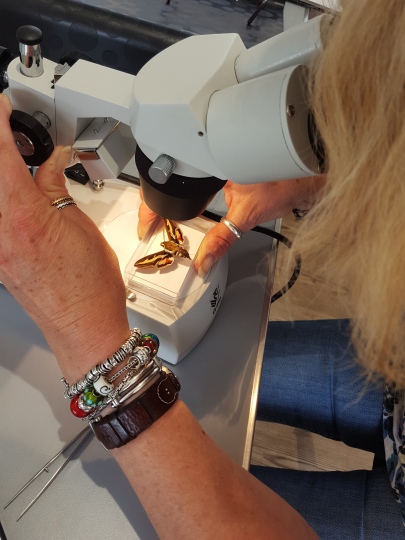
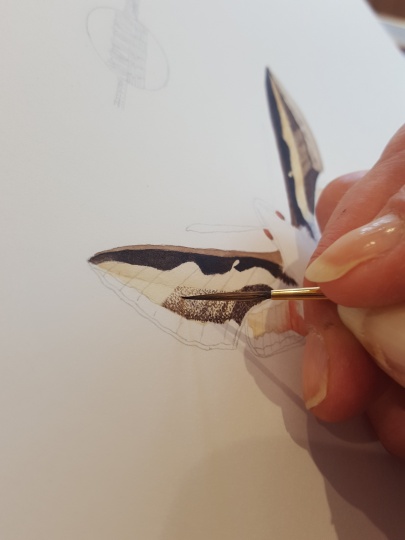
I used a specimen Marsh Fritillary butterfly to take colour reference and pattern form and added it to my drawing of the opening flower head. As my specimen is set in an open position it is great to work from as all detail can be seen and added to the painting. Little error on my part…..I should have turned the butterfly specimen upsidedown as the potion shows the underside of the wings! I wanted to make the butterfly look like it was landing on the flower so used a photo from the internet as reference for positioning.

To plan out my sketch book page I wanted to include as many features of the plants as possible together with my colour references. I spent time drawing up my composition on tracing paper and then cut it up to arrange it on my page. Once I was satisfied I had the best arrangement I traced it all off into my sketch book.

This is my final sketch using watercolour paint and fine liner. It will serve as a good reminder for when I paint the final painting.

Where does the plants name come from? The history behind this flowers name is quite interesting. “Scabious flowers were used to treat scabies, and other afflictions of the skin including sores by the Bubonic Plague. The work ‘scabies’ comes from the Latin word ‘Scratch’ (scabere). The short black root was in folk tales bitten off by the devil, angry at the plant’s ability to cure these ailments.” Hence the name Succisa which means cut short in Latin and pratensis means ‘of a meadow’.
Greater Knapweed Centaurea scabiosa
The late flowering Greater Knapweed is the only food plant of the Coleophoridae case bearer moth (Coleophora didymella). Insects including bees and butterflies are very fond of this plant, notably the Marbled White butterfly.
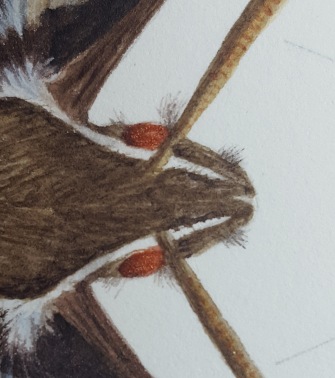
I started by studying the flower head and whole plant as it developed. The flower head resembled Common Knapweed, thistle-like in structure but it is not thorny. The bracts form a fibonacci series pattern on the involucre and have a spidery look to their edges. This involucre encases the seeds which are similar to dandelion seeds. When mature the bracts spring open flat to let the seeds be carried out by the wind. This is as beautiful as the flower head. My plant has not yet matured to reveal this so I have taken my reference from a photograph for the time being.


I began my sketch by breaking the plant into sections and dissecting a flower head, again because it is a very tall plant. The leaves are deeply pinnately lobed and the stems quite hairy. Some areas on the main stems resemble cobwebs. The leaves reduce in size as they go up the plant.


Again I wanted to include as many features of the plants as possible together with my colour references. I spent time drawing up my composition on tracing paper and then cut it up to arrange it on my page as before with the Devil’s-bit scabious then I traced it into my sketch book.

This is the finished sketch ready to trace into my sketch book. I now took colour references and noted them in my sketchbook.

I really wanted to add the Marble White butterfly to the main flower head but in a different position to the Marsh Fritillary on the previous sketch. I found an image of one looking like it is coming across the top of a flower and decided this was the position I wanted to use. Again I used my specimen to take the colour reference and patterns from.

This is the finished piece. Some painted and some outlined in fineliner pen.

Where does the plants name come from? Centaurea, the genus name, comes from the Centaur Chiron, who used flowers of this genus as a poultice to cover a festering wound made by an arrow dipped in Hydra’s blood. The wound was cured and so, the story goes, cornflowers and knapweeds were given the name Centaurea. Greater knapweed was also used to treat skin conditions and scabies, hence the species name scabiosa.
I’ve now also added ‘Habit’ drawings to my sketchbook of all four sketches done so far. A helpful illustration of the whole plant in reduced scale.


Left to right clockwise – Greater Knapweed, Devil’s-bit scabious, Ragged Robin, Horseshoe Vetch
I’ve decided I’d like to buy a flower press! Any suggestions for a good quality one gratefully accepted. These I tried to press in a heavy book. I would love to do it properly next year with all my chosen wildflower plants.

Well until next time, I hope you enjoyed this part of my Sketching adventures!
*All photos, content, text and videos are subject to copyright – Jackie Isard Botanicals 2017