What are my paintings looking dull?
I have heard this question asked so many times online and by students. There is a simple answer and some technical information which I will write for you all now.
3 rules to avoid muddy colours
Rule 1 : Whenever you use a three-way mix of primary pigments remember this little trick. Use mostly two of the primaries and only add a little of the third. This avoids muddiness and keeps the mix brighter.
Rule 2: Use primary pigments that are less saturated. That is, those pigments which are closer to the true primary red, blue or yellow. These mixes will be instantly brighter and less muted.
Rule 3: More saturated primary pigments make more muted, earthy mixes.
How to avoid mixing dull colours
Recognising warm and cool, muted and bright pigments will help you to assess and mix more accurate colours. The basic colour wheel alone does not explain this clearly so read on…
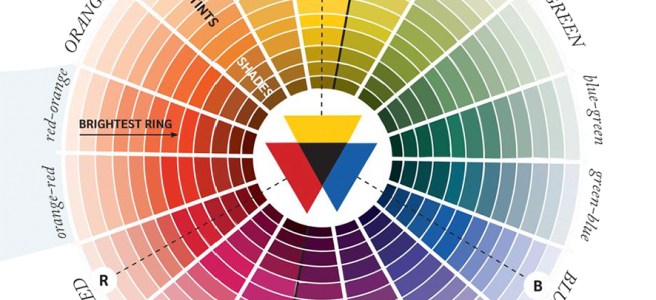
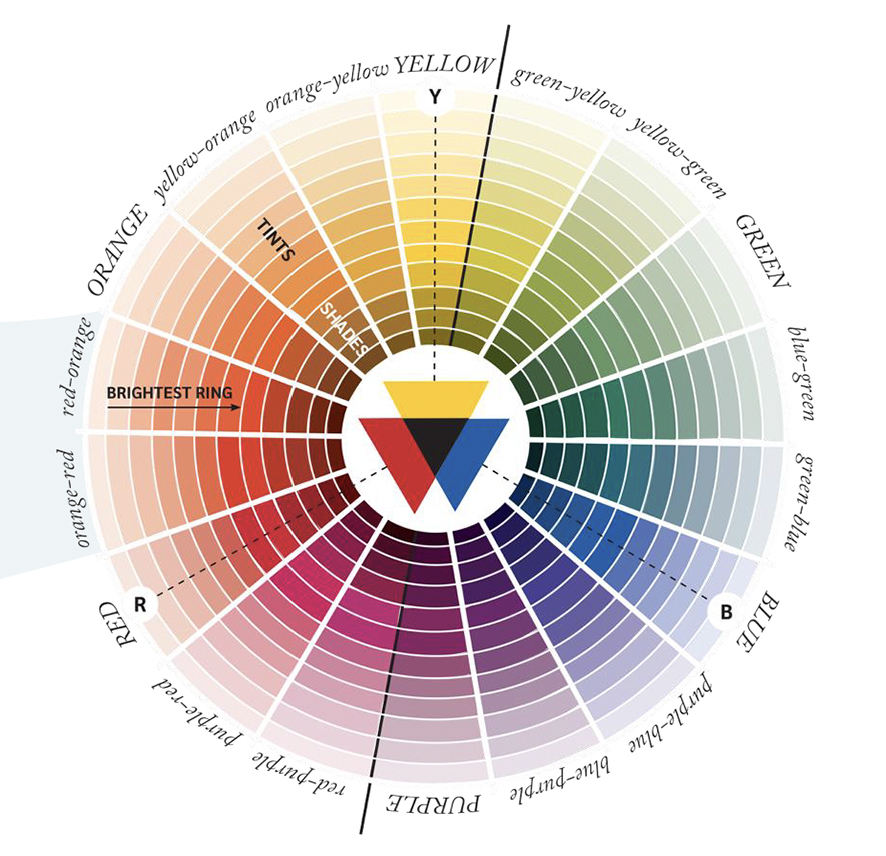
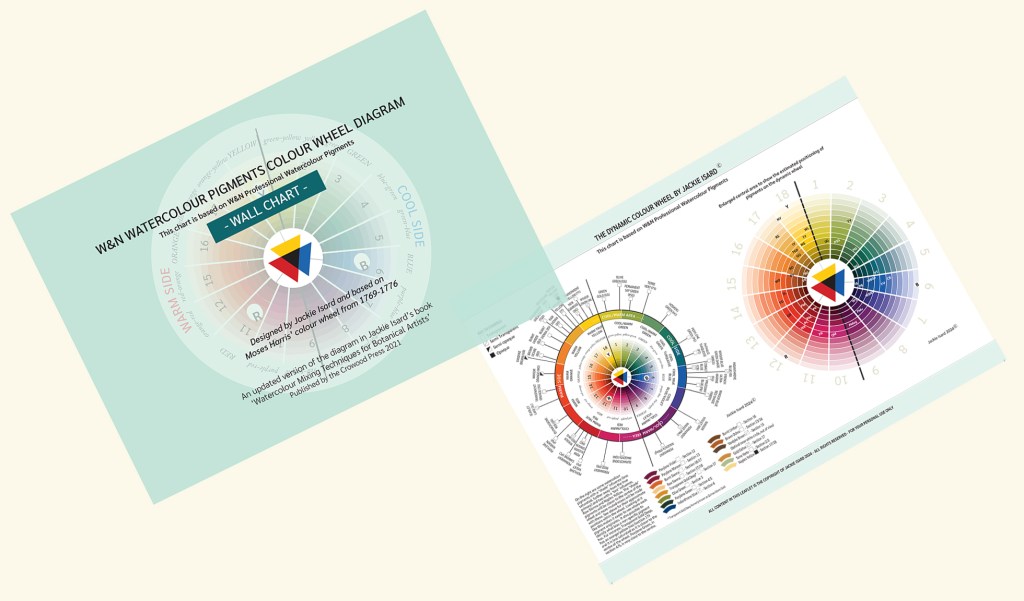
Look at the diagram I made which is based on the Moses Harris colour wheel (Moses Harris 1769 -1776, ‘The Natural System of Colours’). There are 18 sections on this wheel, each section showing how each colour mutes as it gets closer to the centre from the brightest ring. Tints from the brightest ring are lightened as it would be by adding water to watercolour. The sections between the primary and tertiary colours are biased. For example yellow/orange – a yellow biased orange, green/yellow – a green biased yellow.
Each of these section mute down until eventually meeting black at the centre. The blue/purple is a mauve area and the purple/blue is the violet area. Looking at the left side between red and yellow sections you can see where Yellow Ochre, Burnt Sienna, Raw Sienna and Burnt Umber pigments come from.
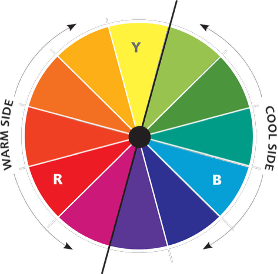
Every colour pigment that you buy can have a warm or cool, muted or earthy appearance. For example, a red like Burnt Sienna or Indian Red are definitely more muted reds and nearer to the middle of the diagram. A green/yellow or yellow/green is warm when compared to a cooler green but sits on the cool side of the wheel. This is a tad confusing! We need to look at this a different way and I will explain why.
Notice the ‘brightest ring’ for yellow, red and blue (not the purple, green or orange area as this is essentially two primaries mixed together – remember rule 1) marked on the concentric circles. These are the pigments that will make the brightest mixes. However, the orange, green and purple/violet pigments in this area will make brighter mixes than those below this line with a very little of the third primary added (rule 1). Any colour that moves towards the centre from this line will make earthy, muted and darker tones. Apply this rule when choosing pigments and you will understand why some mixes can become very muddy!
Understanding colour bias
A red within the orange/red and red/orange sections are warm reds, having an orange bias. The true primary red sits in the next segment. After this the segments move towards the purple/violet spectrum, making them cooler as they take on a violet bias. All reds in the deepening area towards the centre become more muted and earthy, like Burnt Sienna, Permanent Alizarin Crimson, Permanent Carmine, Indian Red, Perylene Maroon etc.
As the brightest ring red moves towards the violet (purple) spectrum it becomes a cool red, like W&N Quinacridone Magenta (PR122) or Permanent Rose (PV19). Paint Permanent Rose next to Quinacridone Red and you will see it has a cool violet bias. Paint the same pigment next to Quinacridone Magenta and Permanent Rose will appear warmer as the violet bias is not so extreme. A blue with a green bias, when mixed, will behave as if a little yellow has been added to the mix. A blue with a violet bias, when mixed, will behave as if some red has been added. Recognising biases will help you to choose the right pigments to make a brighter mix or a more muted one.
There is a pigment comparison list later in this blog which gives the names of pigments across three other brands which are similar or the same as the W&N names I refer to here.
Both bright and muted mixes are relevant in botanical painting. Shadow tones and deeper richer colours will need to be muted a little to create depth and form. For example, adding a little more red and blue to your green mix to make the shadow edge tones. It really pays to get to know your palette of pigments to see which ones will create the tone you need – muted or bright!
and here’s more…..
It is known that red, yellow and blue will make brown or a black mixed in the right proportions. Mixing browns with warm or cool brighter pigments will give different results. There are many tones of brown. Using different sets of primaries will create many different brown mixes. This also applies to black. A true rich black or a cool cold black. There are even different blacks!
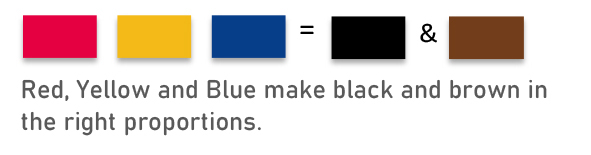
Using three pigments and avoiding muddy mixes
Remembering here rule 1 at the beginning of this blog. The more of the third primary you add to a mix, the more muted it becomes. The secret of bright mixes is not only this but also depends on the saturation of the pigment. Selecting colours on the ‘brightest ring’ of the diagram will be more saturated.
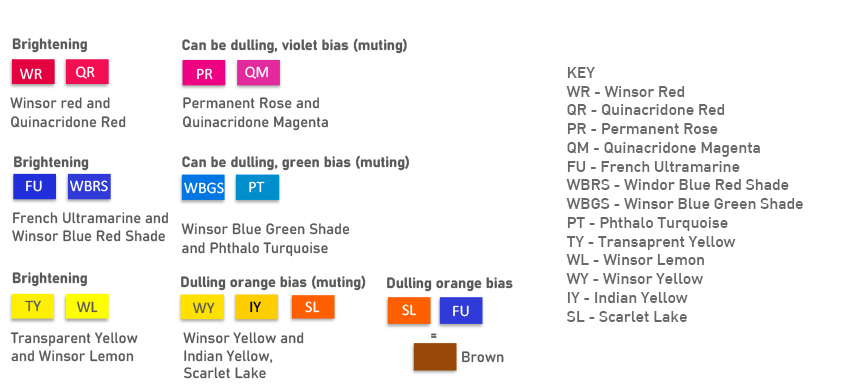
Saturated pigments: These are the colours that are closest to the absolute primary colour. For instance, Quinacridone Red and Winsor Red are true primary reds. Permanent Rose and Quinacridone Magenta will be more saturated as they are closer to the violet (purple) spectrum. Winsor Lemon or Transparent Yellow are true primary pigments. Winsor Yellow or Indian Yellow are heading towards the orange spectrum so will be more saturated.
Tertiary colours
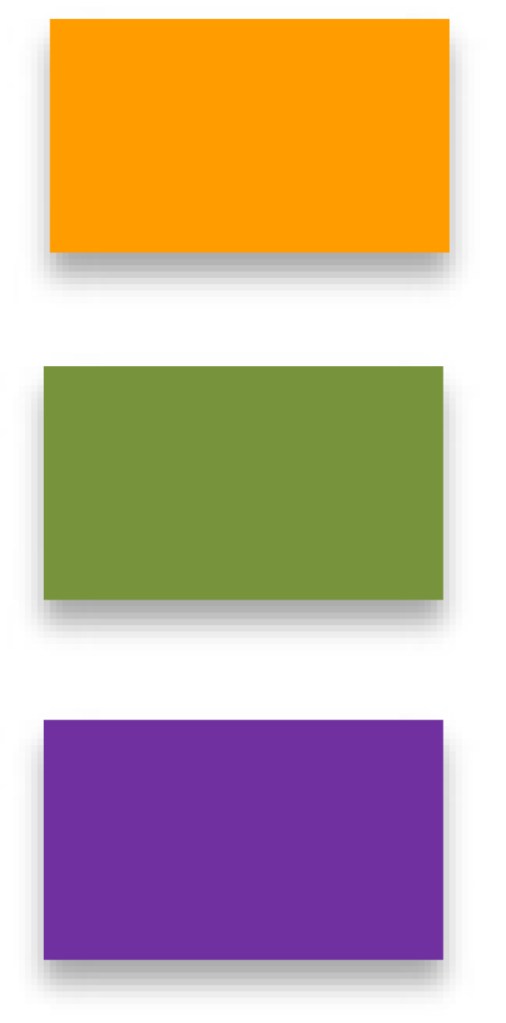
Tertiary colours are orange, green and purple (violet). Anything you add to a tertiary colour will mute or become earthy in tone. This is because these colours are already mixed primaries; red and yellow (orange), blue and yellow (green), red and blue (violet).
Intensity
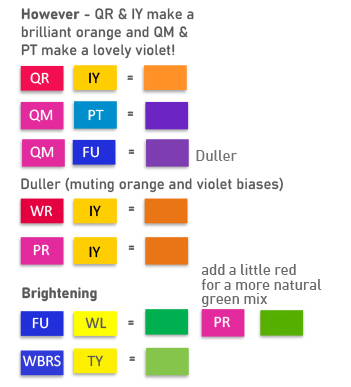
Pigment strength, brightness, or purity. Some pigment intensity can be very high, therefore less pigment is needed when mixing. This is especially so with ‘permanent’ pigments. Quinacridone Red, Cobalt Blue, Viridian, Winsor Lemon, Raw Sienna are all weaker pigments, so you’ll need to add more to a mix if mixing with a high intensity pigment. Staining pigments usually have a very high intensity of pigment. Below is a chart that shows some pigments that will dull or brighten a mix and below this are some anomalies that do make bright mixes despite being biased.
Anomalies
All pigments in my palette are lightfast, transparent or semi-transparent with a good permanency rating. Transparency ensures vibrancy and translucence. Permanency and lightfastness ensures your painting will last a life time.
Pigments by the same name and index colour
Pigments with the same name do not translate across brands. Never think this is so. Colour with the same index numbers do not always translate across brands either. There are two blogs linked below to read more about this.
Index numbers also have variations of scale too. The codes for index numbers is listed here.
PY – Pigment Yellow
PO – Pigment Orange
PR – Pigment Red
PV – Pigment Violet
PB – Pigment Blue
PG – Pigment Green
PBr – Pigment Brown
PBk – Pigment Black
Here’s an example. PB15 is divided into a spectrum of blues within the same index number. Your may see PB15:6 or PB15:3 on tubes of Sennelier Blue watercolour. The green bias version of this blue is PB15:3 (Sennelier Bleu Phthalo Vert) and the red biased version PB15:6 (Sennelier Bleu Phthalo Rouge). So, if you open a tube of a pigment with the same index number as a pigment in another range, it may not be the same ratio when you paint with it!
Pigment brand comparisons
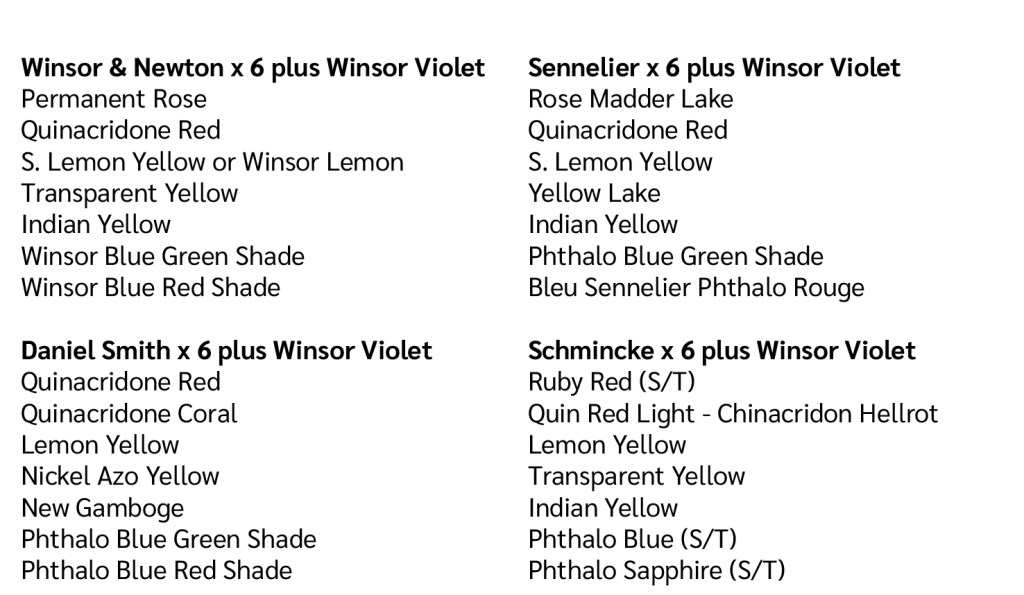
Note: DS has no equivalent to Quinacridone Magenta apart from Opera Rose PR122 but this pigment has the addition of fluorescence and so it will fade in light (fugitive).
Read more in my blogs below.
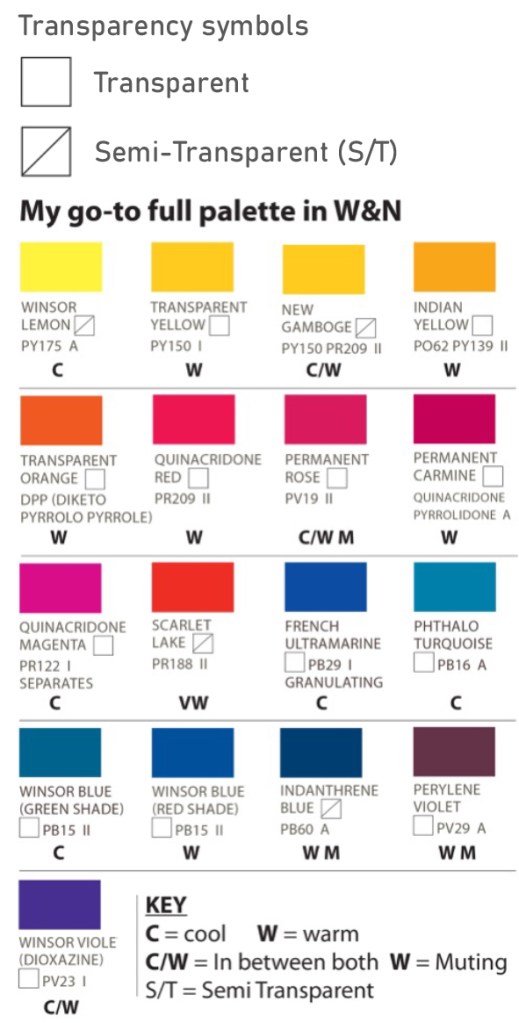
My go-to palette in W&N
I sell an A4 leaflet for £1.50 of my colour diagram featured in this blog. If you would like to buy one please email me at jackieisard@googlemail.com. Postage will be quoted on receipt of your location. A pdf version is also available by email at £1.50.
I do hope you found this blog useful and welcome any feedback or questions!







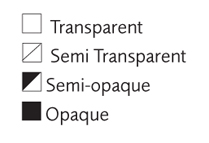 Here I have split some of the W&N blues into categories. The permanency, lightfastness and transparency ratings are under each colour:
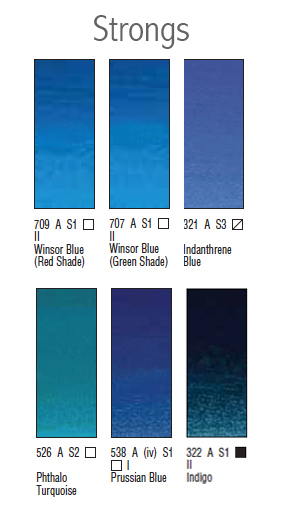 Strongs – those which have greater intensity of pigment, you’ll need less when mixing!
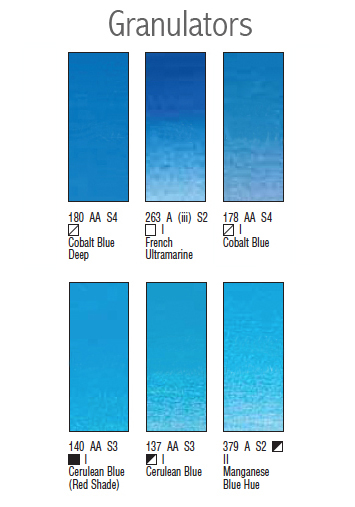 Granulators – those which granulate, not good for smooth rendering! Some of them will granulate more than others. Cobalt Blue isn’t as grainy as French Ultramarine. However, Ultramarine Green Shade shows very little granulation, but it does have a very slight green bias compared to French Ultramarine. I like the intensity of this pigment compared to French Ultramarine though.
Cerulean is a particularly granulating pigment and semi-opaque. If used as an underlayer, you will not achieve a smooth see-through effect with it. It is good for textured style painting though. See the image below for a comparison. Hopefully you can see it as this was quite hard to photograph! The difference is more obvious in real life. Try it out and see for yourself.
Granulators – those which granulate, not good for smooth rendering! Some of them will granulate more than others. Cobalt Blue isn’t as grainy as French Ultramarine. However, Ultramarine Green Shade shows very little granulation, but it does have a very slight green bias compared to French Ultramarine. I like the intensity of this pigment compared to French Ultramarine though.
Cerulean is a particularly granulating pigment and semi-opaque. If used as an underlayer, you will not achieve a smooth see-through effect with it. It is good for textured style painting though. See the image below for a comparison. Hopefully you can see it as this was quite hard to photograph! The difference is more obvious in real life. Try it out and see for yourself.
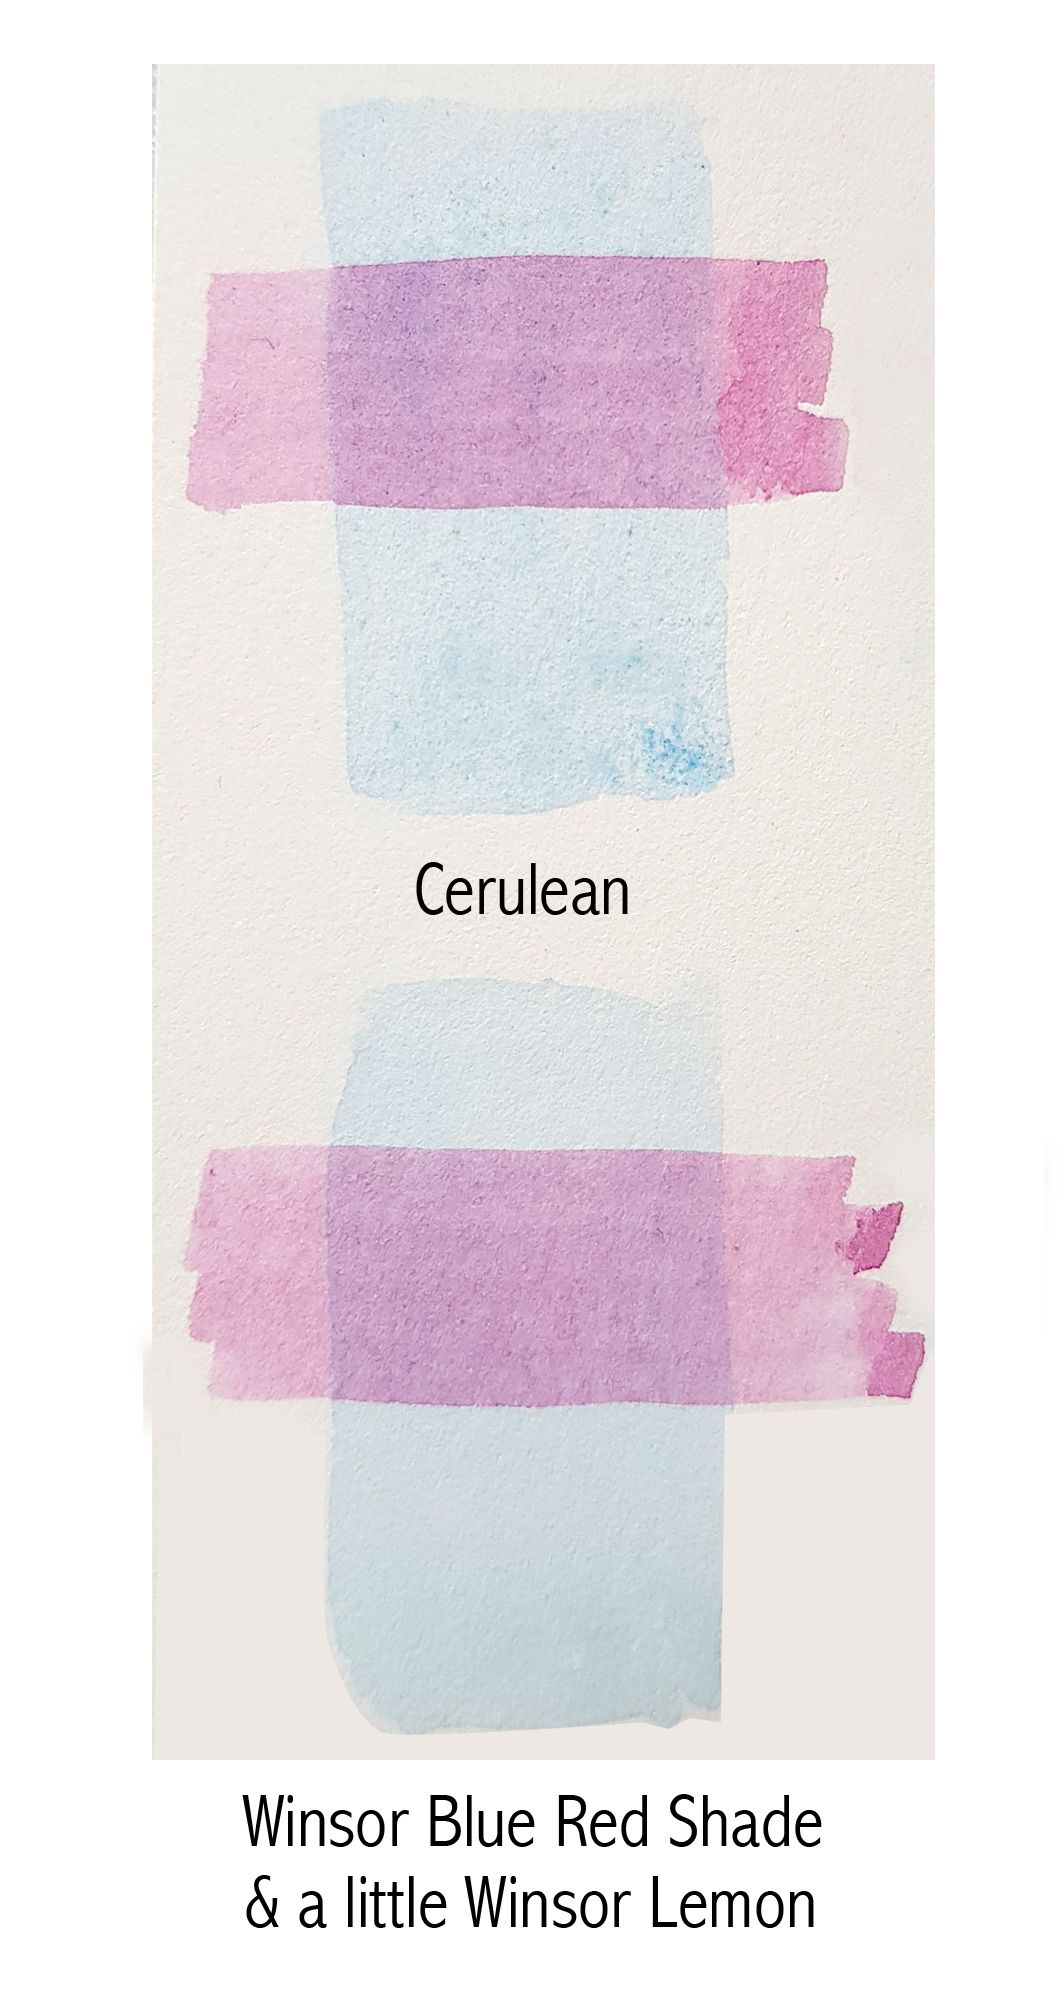 As seen above, a purple overlay was painted over base layers of Cerulean and Winsor Blue (Red Shade). The purple mix overlaid is a transparent mix. As you will see in the Cerulean example, it appears less crisp and quite mottled by the granulation. It also looks a little flatter where transparency is concerned. The Winsor Blue (Red Shade) underlay appears crisper and more see-through. So, if you are looking for a lighter blue underlay but with a slight yellow bias, just add a teensy bit of Winsor Lemon to Winsor Blue (Red Shade) and you will have a lovely smooth Cerulean look-alike!
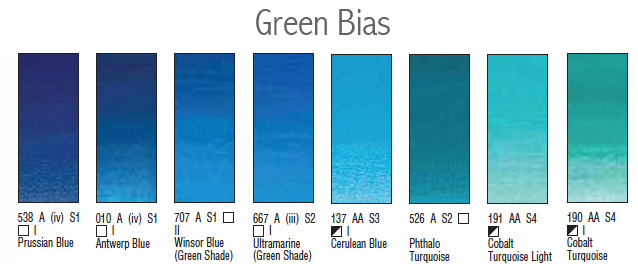 Green bias – those which will cool a mix or are more green in appearance. Further along the image above are the very green bias blues, turquoise. The greener a blue is, the more vivid it will be when mixing greens. It will need to be tamed by adding a tiny bit of red to make a more natural mix. Add Quinacridone Red (QR) to Phthalo Turquoise (PT) and you will make a muted purple/mauve/burgundy because of the green bias. Add QR to Ultramarine Green Shade (UGS), a less green biased blue, and you will make brighter purple and mauve. This is because the green bias adds more yellow to the mix muting it down. Yellow and blue make green (green/blue), plus red makes brown!
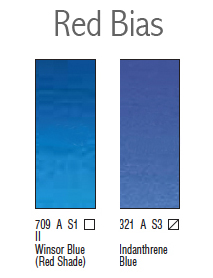 Red bias – those which will add warmth a mix. Add Transparent Yellow to a red bias blue and you will make more natural greens. Add it to Winsor Blue (Green Shade), a green bias blue, and you will make vibrant but less natural emerald greens. Red will need to be added to tame these mixes.
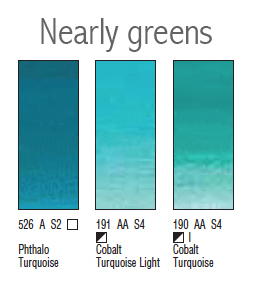 Nearly greens – those which have a definite green bias. You will notice above that Cobalt Turquoise and Cobalt Turquoise Light are semi-opaque. They also granulate. I would only use these for textured, looser style painting.
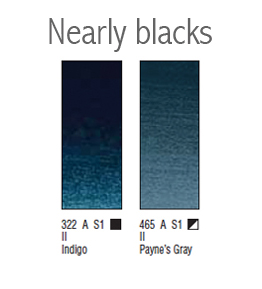 Nearly blacks – those blues which are very dark pigments with a blue bias. Notice also that both Indigo and Payne’s Grey are opaque and semi-opaque. These pigments contain black which gives them their opacity. Both have the same colour index numbers – PB15 • PBk6 • PV19 but in different proportions. The black colour index will make a mix dense and flat looking. These pigments are only useful in extremely dark areas although darkening a mix is much better using transparent or semi-transparent primaries. If done this way, it will still have a see-through feel despite being almost black.
My underlay blue choices
My favourite blues for underlaying are Winsor Blue (Red Shade), French Ultramarine and Cobalt Blue. Winsor Blue (Red Shade) is particularly good when watered down as it is really smooth. It is a lovely bright red biased blue. Make sure you paint it on very pale though as it is one of the stronger pigments. It is also one of my favourite blues to mix with. French Ultramarine, although it granulates, when used very thinly it adds a nice coolness. It is a blue with little to no bias. It is great for edging highlights on dark coloured leaves like holly. Cobalt is a lighter blue which also granulates a little. Again, used thinly, it adds a nice coolness to the layers above.
Well that’s it for this month! If you like, please do message me with any suggestions of which colours you’d like to discuss next.
Until the 24th of next month, I hope you all have a great August. Maybe even have a break and be able to spend a few days away from home!
Nearly blacks – those blues which are very dark pigments with a blue bias. Notice also that both Indigo and Payne’s Grey are opaque and semi-opaque. These pigments contain black which gives them their opacity. Both have the same colour index numbers – PB15 • PBk6 • PV19 but in different proportions. The black colour index will make a mix dense and flat looking. These pigments are only useful in extremely dark areas although darkening a mix is much better using transparent or semi-transparent primaries. If done this way, it will still have a see-through feel despite being almost black.
My underlay blue choices
My favourite blues for underlaying are Winsor Blue (Red Shade), French Ultramarine and Cobalt Blue. Winsor Blue (Red Shade) is particularly good when watered down as it is really smooth. It is a lovely bright red biased blue. Make sure you paint it on very pale though as it is one of the stronger pigments. It is also one of my favourite blues to mix with. French Ultramarine, although it granulates, when used very thinly it adds a nice coolness. It is a blue with little to no bias. It is great for edging highlights on dark coloured leaves like holly. Cobalt is a lighter blue which also granulates a little. Again, used thinly, it adds a nice coolness to the layers above.
Well that’s it for this month! If you like, please do message me with any suggestions of which colours you’d like to discuss next.
Until the 24th of next month, I hope you all have a great August. Maybe even have a break and be able to spend a few days away from home!